
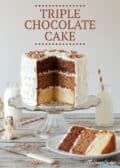
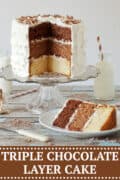
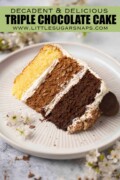
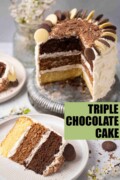
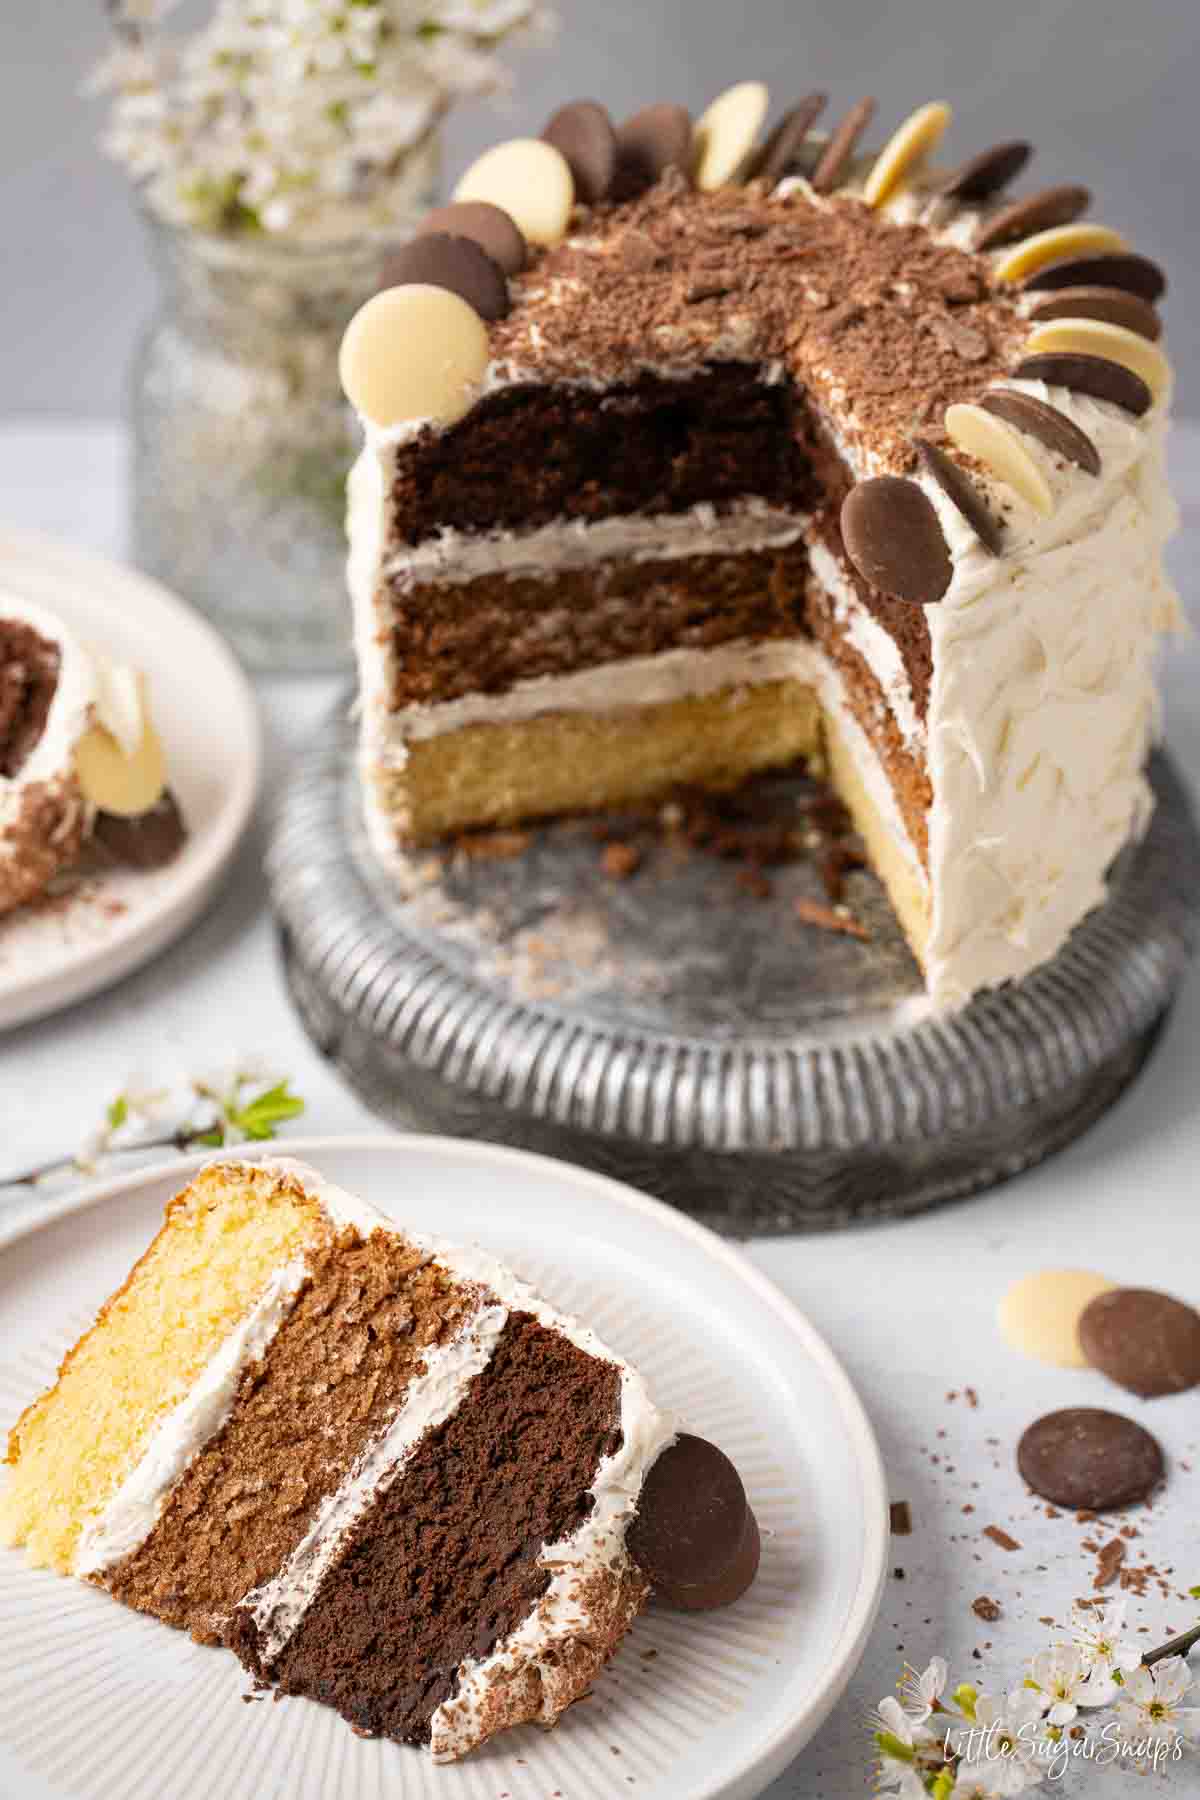
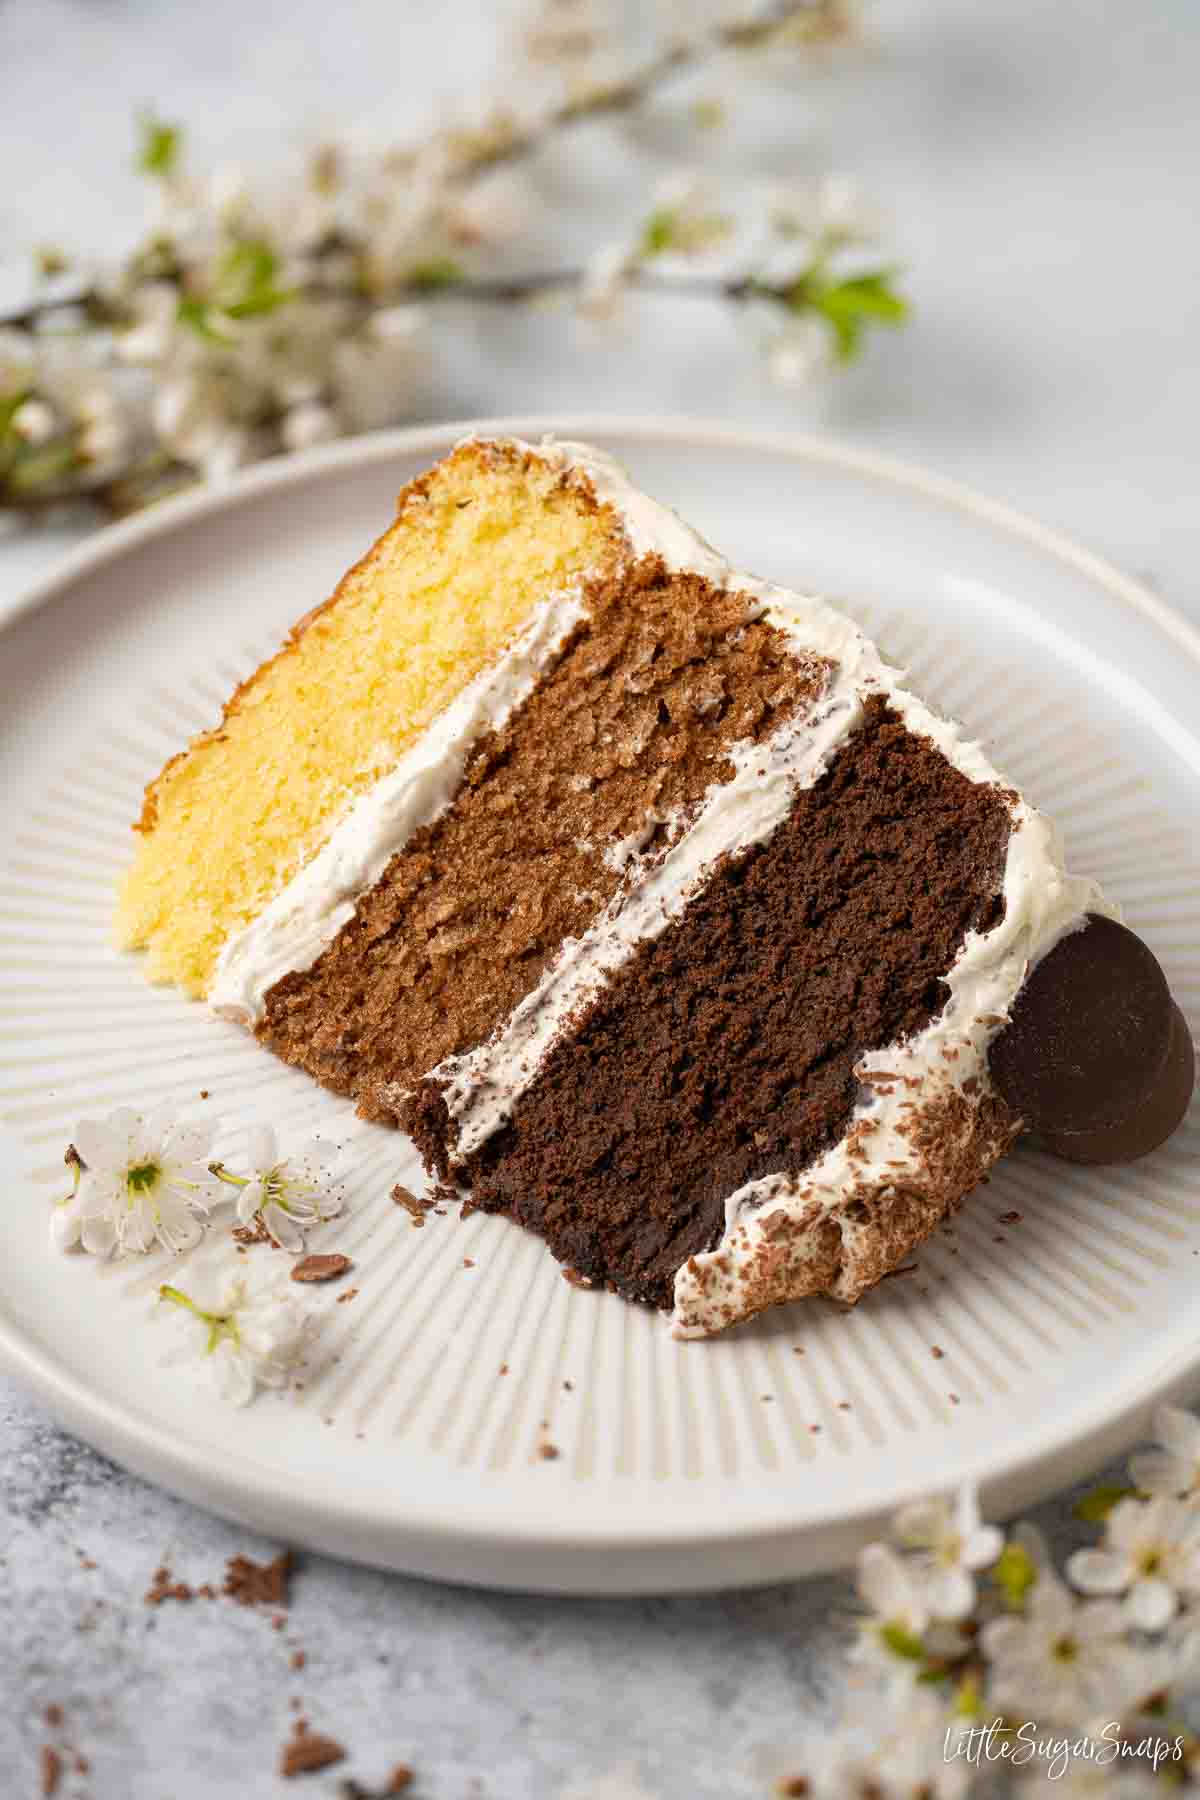
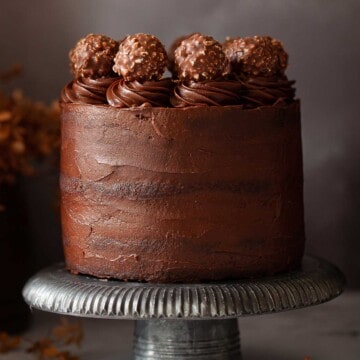
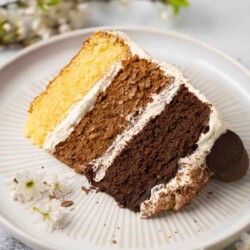
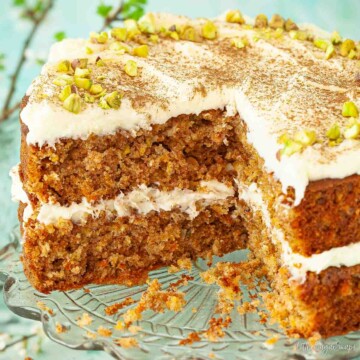
This triple chocolate layer cake is a three layer cake featuring white chocolate, milk chocolate and dark chocolate sponges stacked with luscious vanilla marshmallow fluff buttercream. It's rich, soft and a treat for chocolate lovers looking for something a little different.
Serve this cake with mugs of white hot chocolate or malted hot chocolate.
Why I Love This Three Layer Cake
- Three distinctly different layers of chocolate cake: white chocolate & vanilla, malted milk chocolate & dark chocolate.
- Hidden secret: At first glance, it's simply a rich chocolate layer cake. But once sliced, the distinct layers reveal themselves, taking it to a whole new level.
- Flavour: This triple chocolate layer cake outshines most ordinary chocolate cakes by miles.
- Texture: The sponge layers are wonderfully light, fluffy, and perfectly moist - proof that this cake delivers on both style and substance.
- Unique buttercream: The marshmallow fluff buttercream stops this three layer cake from being too chocolately.
Jump to:
- Why I Love This Three Layer Cake
- What Is Marshmallow Fluff Buttercream?
- Ingredients Notes
- Equipment Notes
- How To Stop Melted Chocolate From Seizing In Cake Batter
- How to Make Three Layer Chocolate Cake (Step-By-Step Instructions)
- Storage Instructions
- Freezing Instructions
- Expert tips
- Frequently Asked Questions
- More Three Layer Cakes
- 📖 Recipe
- 💬 Comments
If you want to go all out on white chocolate take a look at my white chocolate and raspberry cake, chocolate Baileys cake and my Biscoff, pear & white chocolate cake. But if a three layer cake seems a step too far then try my far simpler Dairy Milk cake - it's guaranteed to put a smile on faces as it's eaten.
What Is Marshmallow Fluff Buttercream?
Marshmallow fluff buttercream is cream cheese frosting with the addition of Marshmallow Fluff & vanilla bean paste mixed in. Marshmallow Fluff is a spreadable marshmallow creme, hugely popular in the US. It is now commonly available in UK supermarkets too - try looking for it alongside Nutella.
This buttercream is everything you could wish for in an icing: sweet, light, fluffy, easy to spread and, without a doubt, a step up from standard vanilla buttercream. It also features in my Pumpkin Pie Whoopie Pies.
Ingredients Notes
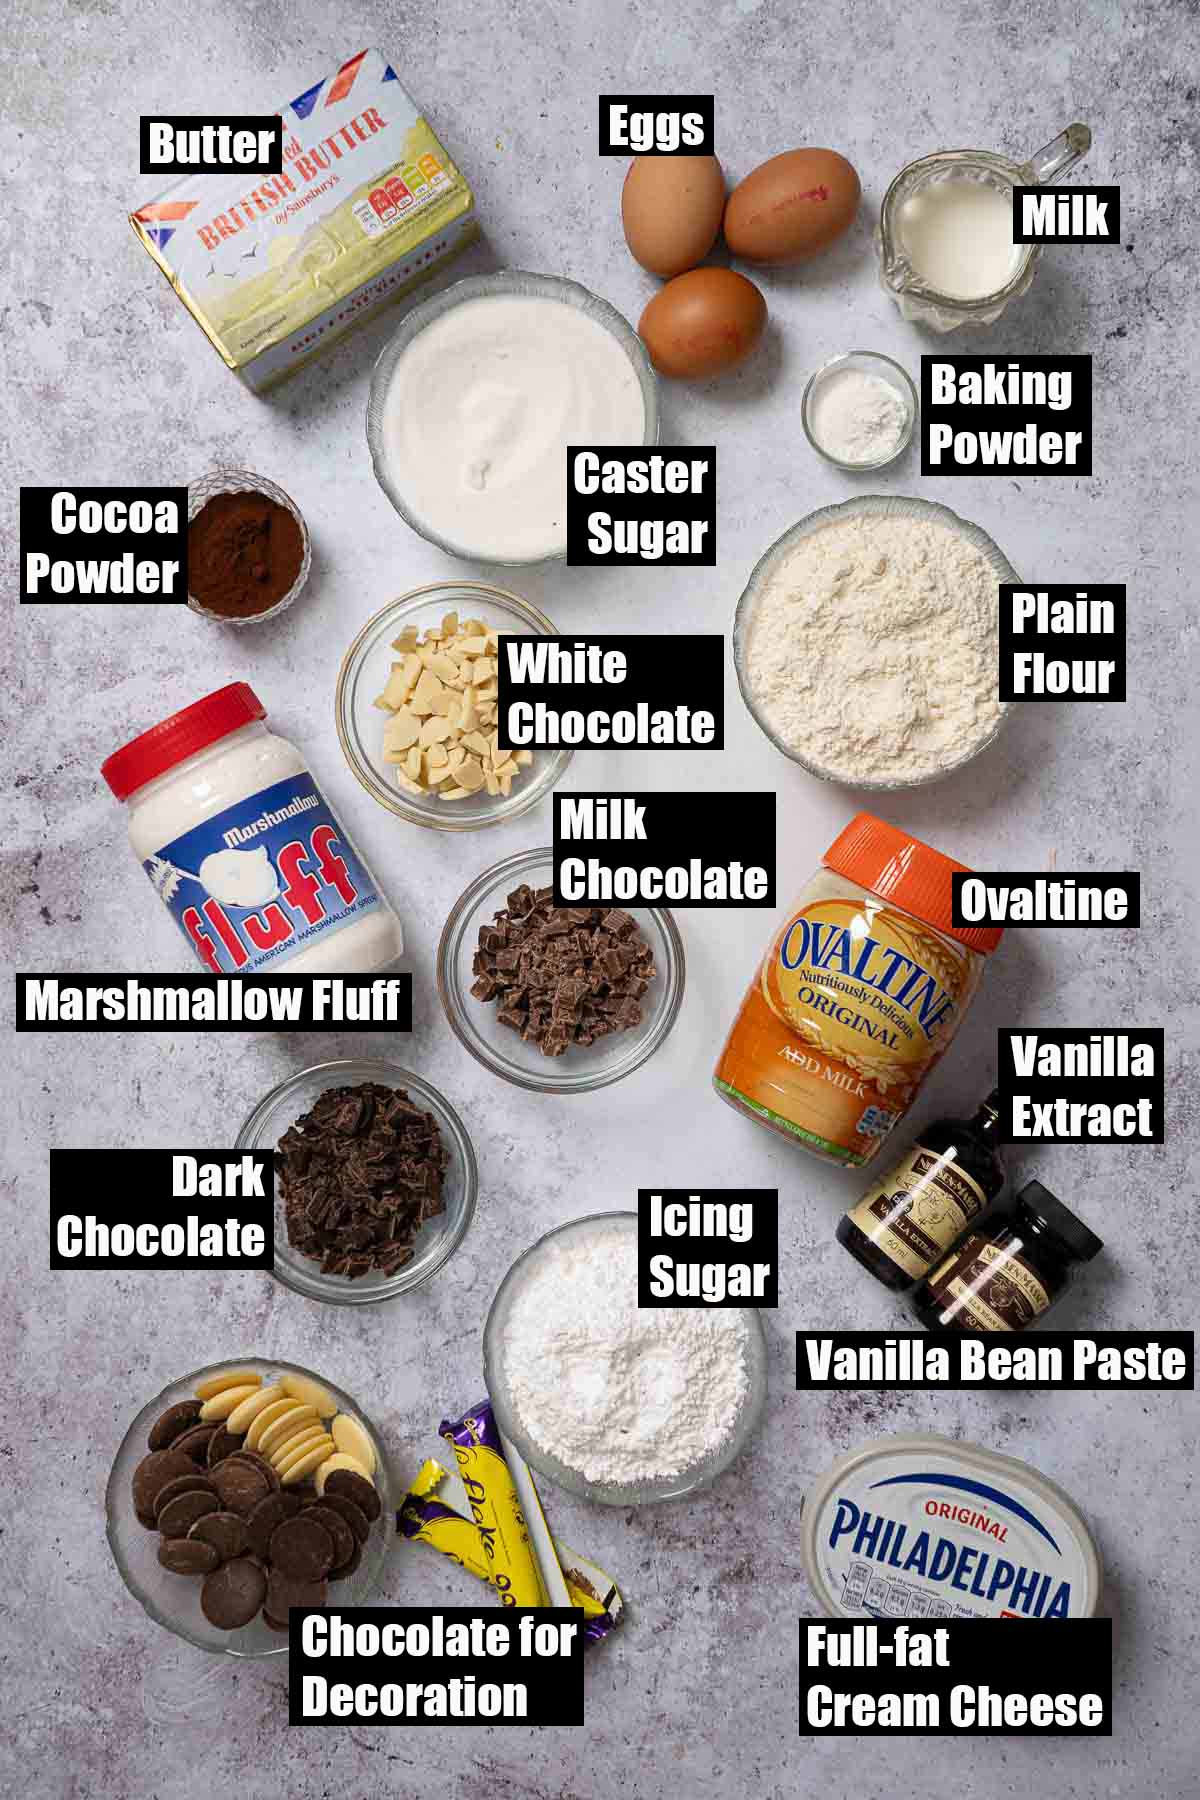
Butter/ Baking margarine: It's fine to use either butter or baking margarine for making the sponge cakes. But when it comes to the cream cheese frosting only butter will do. Margarine is a poor substitute here as it lacks depth of flavour and is softer than butter.
Chocolate: Use good quality chocolate when making the sponge cakes. Really cheap chocolate does not always melt well. I have found Callebaut to give consistent results.
Ovaltine: This is a malted milk powder designed to be mixed into hot milk to create a comforting warm milky drink. It's fine to use Horlicks in place of Ovaltine. But whichever brand of malted milk powder you select do ensure that you use the regular 'full-fat' version rather than the 'light' or 'skinny' ones. The latter do not always give fantastic results in baking.
Marshmallow Fluff: For the buttercream frosting, use the original rather than the strawberry version.
Equipment Notes
Please note: the recipe listed is for a three layer chocolate cake made in 6-inch cake pans. This cake is ideal for serving 8-10 people.
These cake pans are smaller than typical ones, which tend to measure 8-inches. I have included some instructions below for scaling up to large pans.
tips when working with chocolate
How To Stop Melted Chocolate From Seizing In Cake Batter
Each layer of this three layer chocolate cake contains real melted chocolate, which gives it an incredibly rich flavour. However, melted chocolatecan sometimes seize when added to cake batter if it is not handled carefully.
A few readers have mentioned this issue, so here are my best tips to help you avoid it:
- Use room temperature ingredients: Cold ingredients are the most common caise of seiezed chocolate. If the batter is too cold, the chocolate can start to set as soon as it is added.
- Work fairly quickly: Chocolate that cools too much after melting becomes harder to mix smoothly. I usually melt it just before I begin to mix the cake batter so it has around 5 minutes to cool slightly while I work.
- Temper the mixture first (important step): Do not pour melted chocolate straight into the batter. Instead, briskly stir one tablespoon of batter into the chocolate first, then fold this mixture back into the main bowl of batter.This helps balance the temperatures and prevents the chocolate from seizing.
Keep these three steps in mind and your chocolate should incorporate smoothly each time.
How to Make Three Layer Chocolate Cake (Step-By-Step Instructions)
- Step 1: Grease and line 3 x 6-inch circular baking tins and preheat the oven.
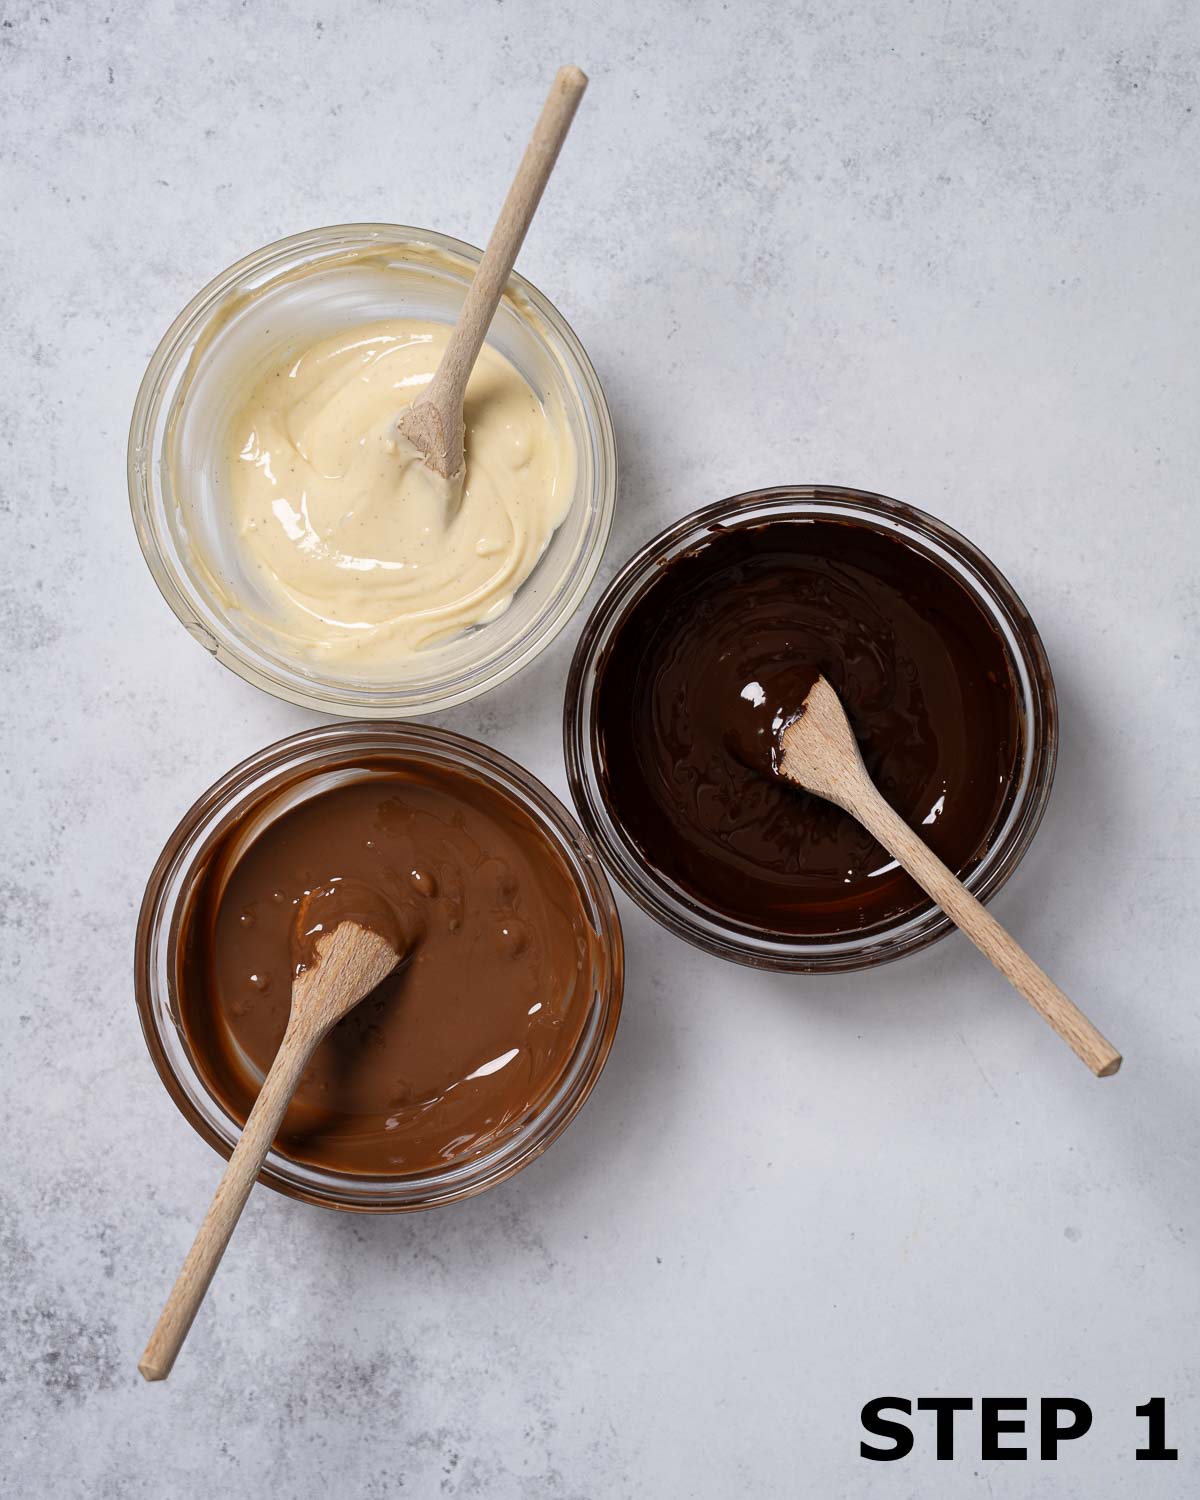
Melt the 3 types of chocolate in separate bowls. Set aside.
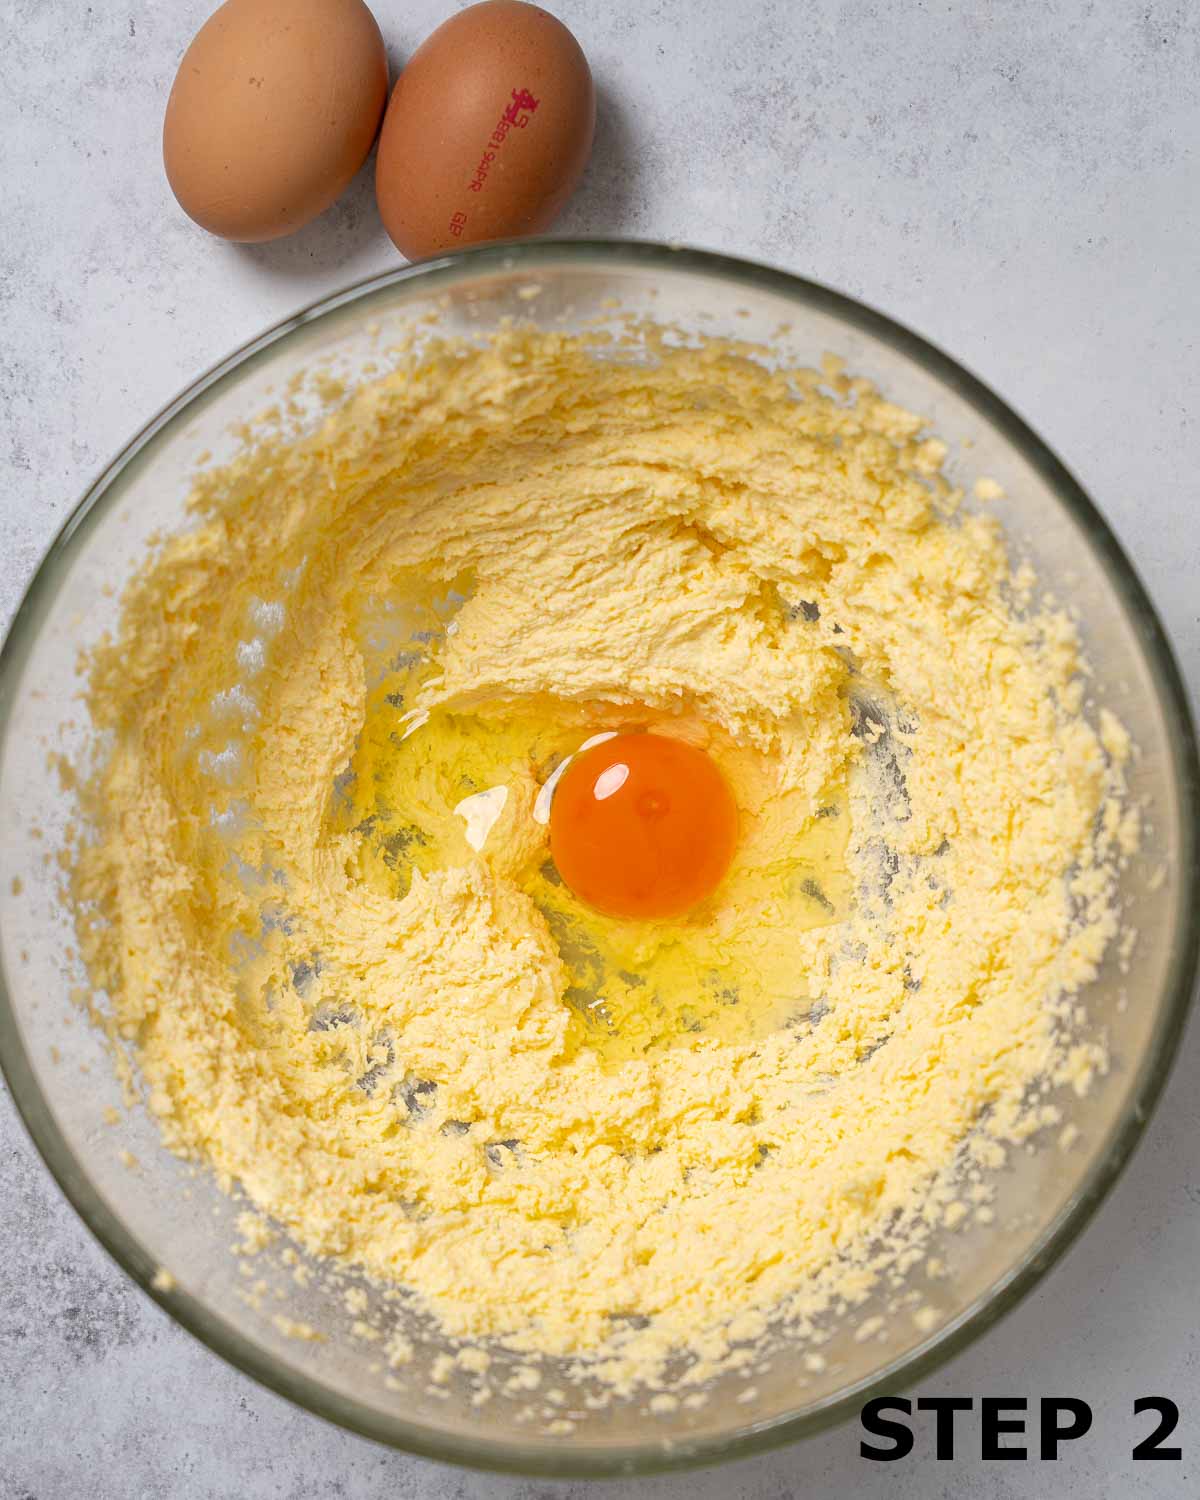
- Step 2: In a bowl beat the butter and sugar until light and fluffy, using electric beaters.
Add the eggs, one at a time, beating well between each addition. Beat in 3 tablespoons of the milk and beat again.
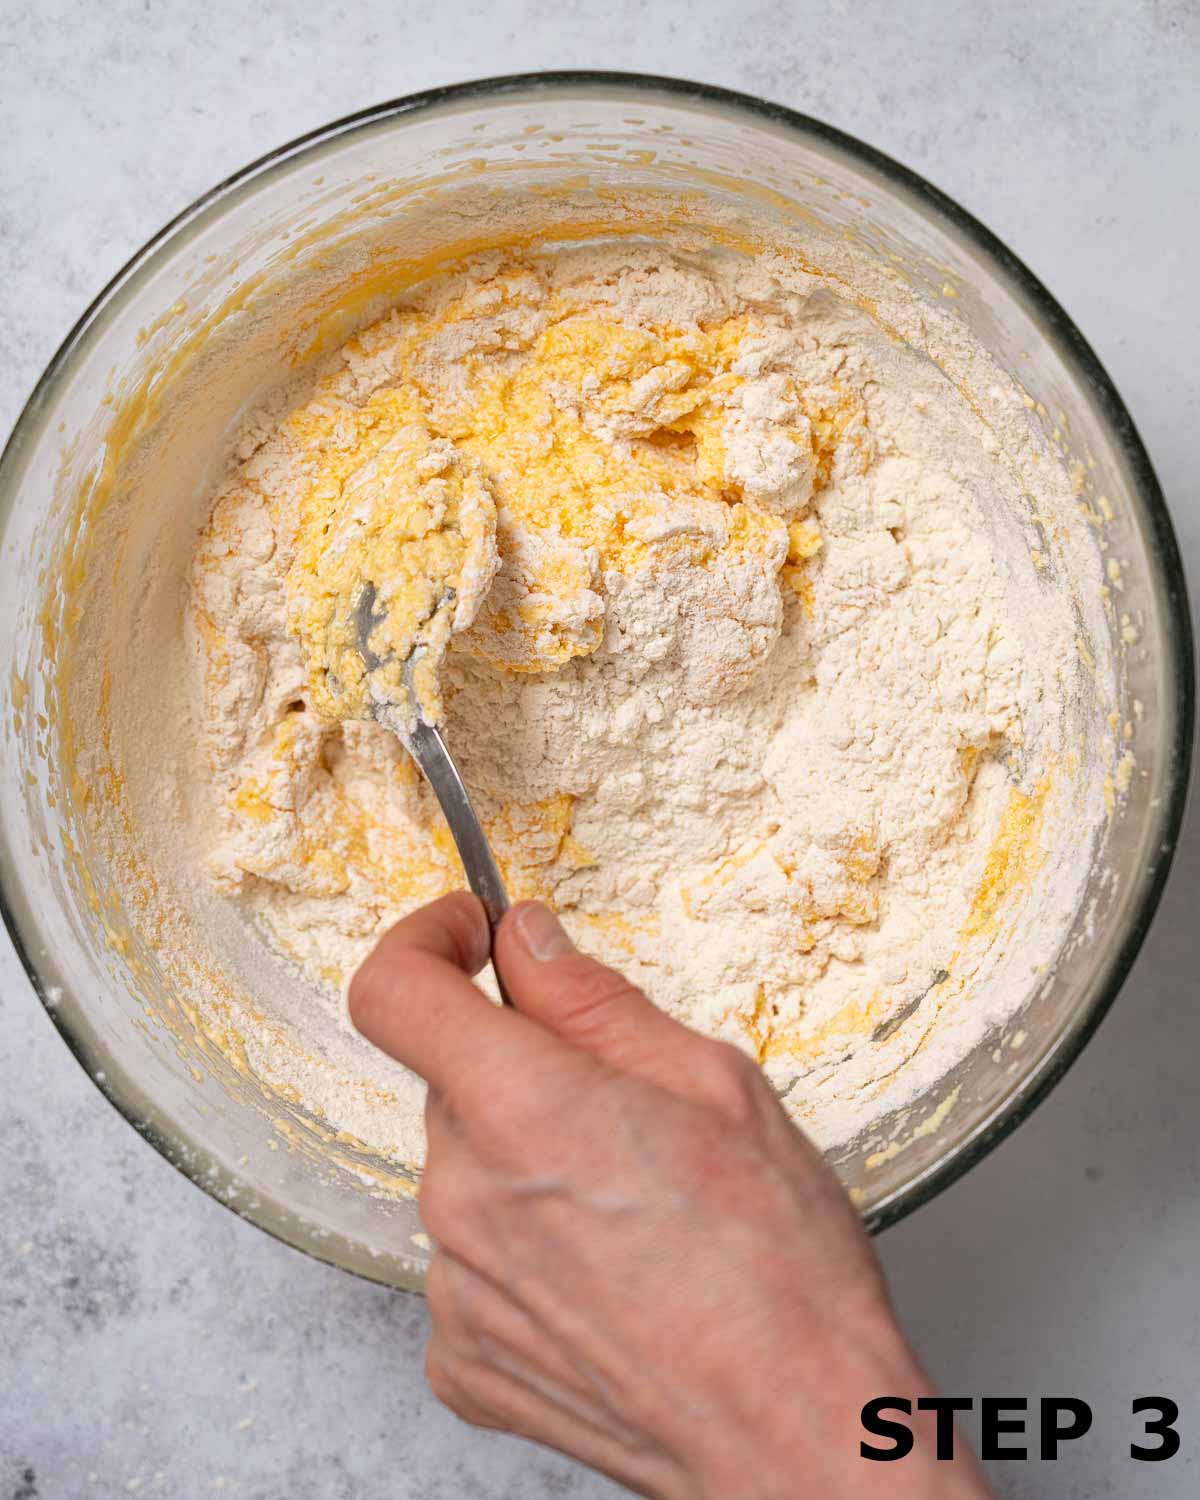
- Step 3: Sift the flour and baking powder into the bowl and fold it in, using a large metal spoon, until just combined.
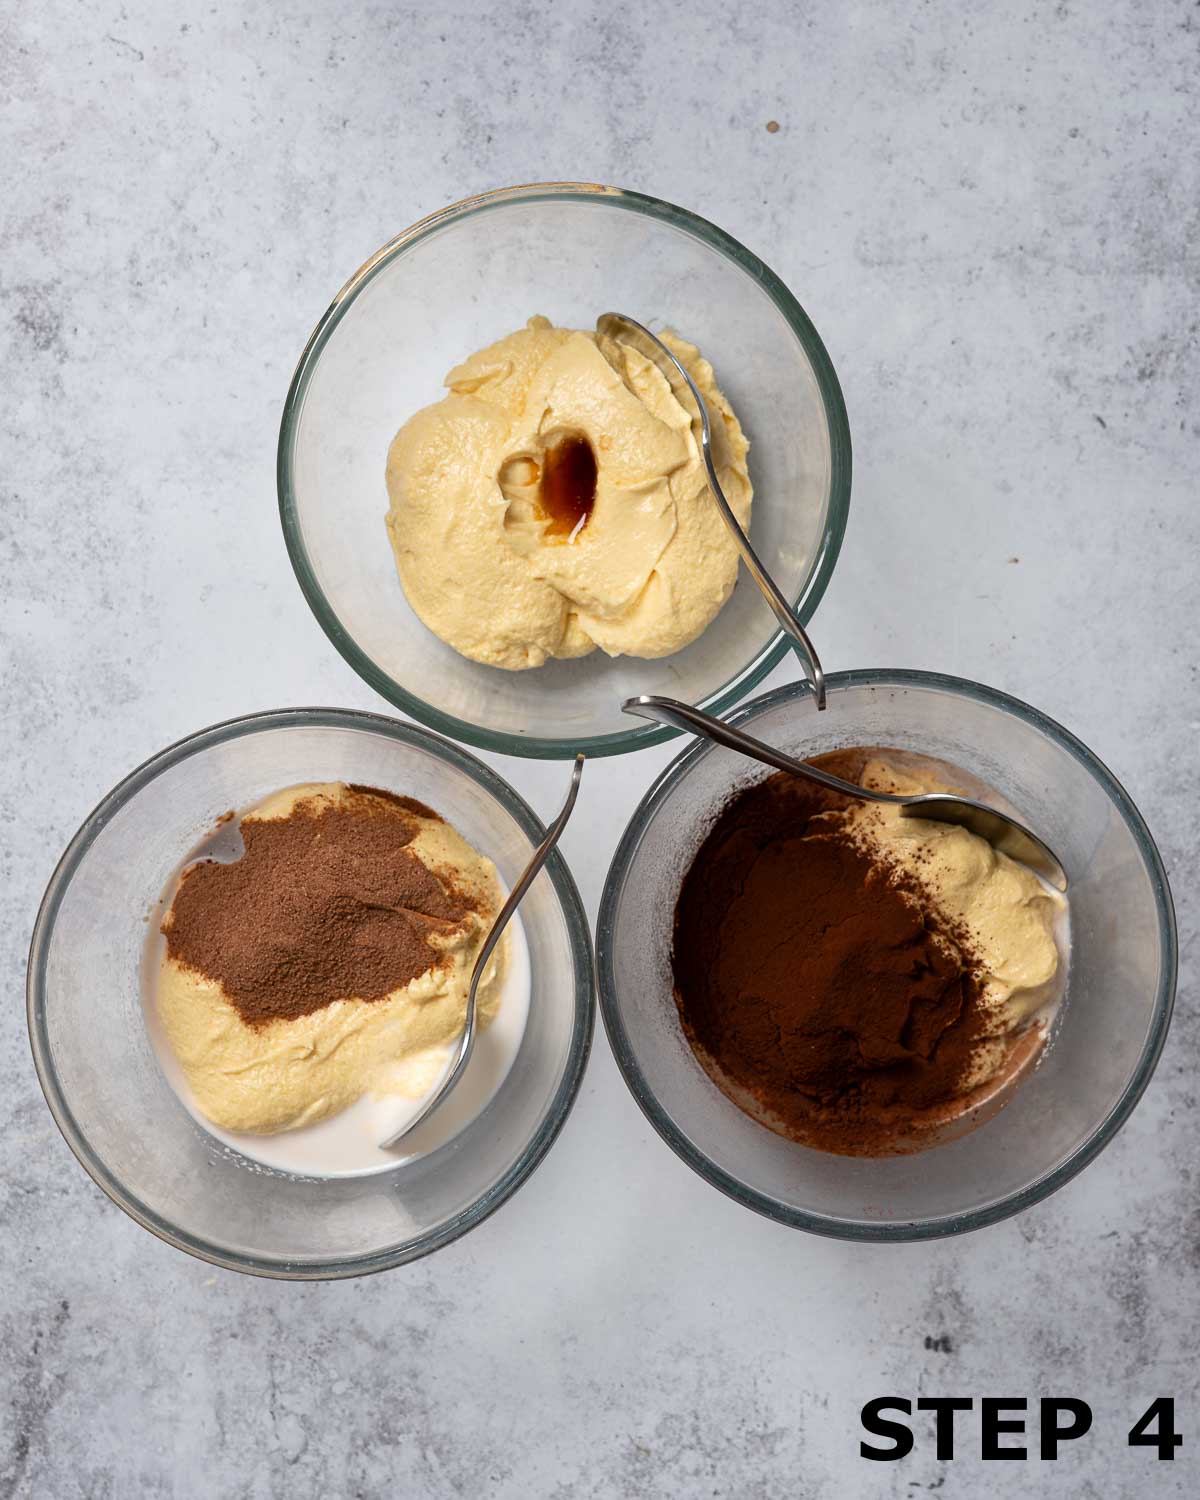
- Step 4: Divide the cake batter equally into 3 small mixing bowls.
Bowl 1: Fold in vanilla extract.
Bowl 2: Fold in sieved Ovaltine & ½ tablespoon milk.
Bowl 3: Fold in sieved cocoa powder and 1 ½ tablespoons milk.
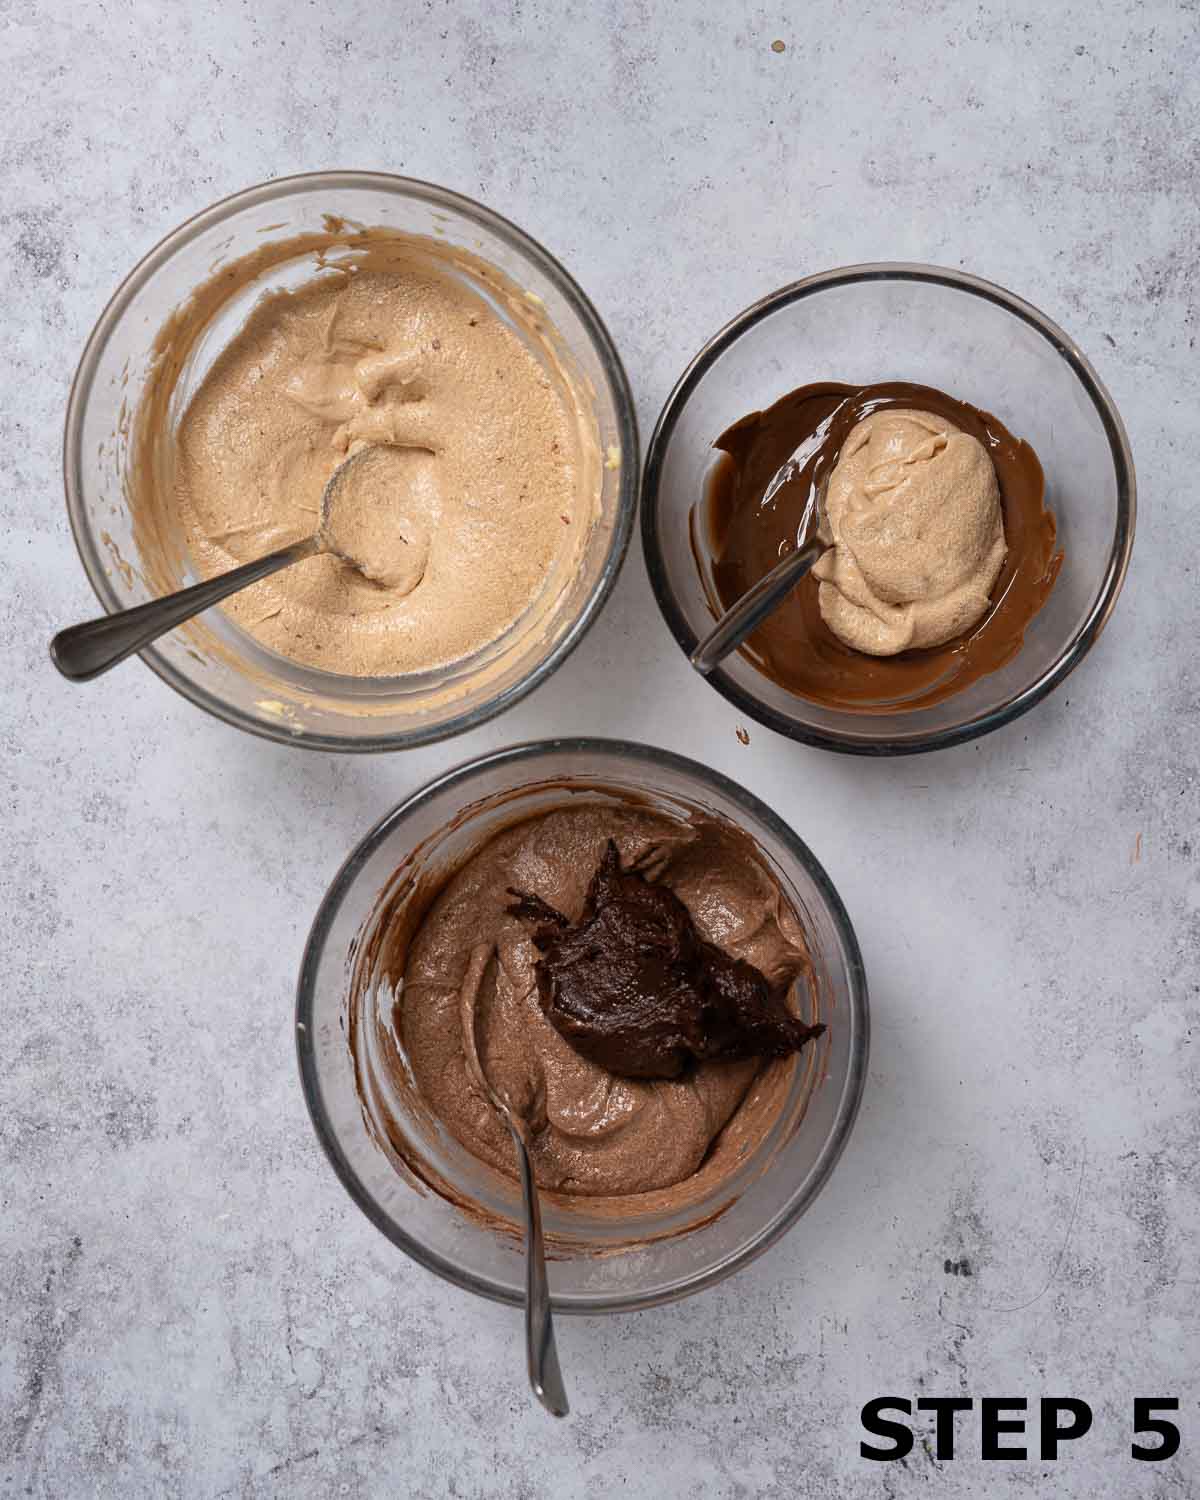
- Step 5: Now add the melted chocolate to each bowl using the method described above (stir 1 tablespoon of cake batter into the chocolate first, then fold it back into the main bowl).
Bowl 1: White chocolate.
Bowl 2: Milk chocolate.
Bowl 3: Dark chocolate.
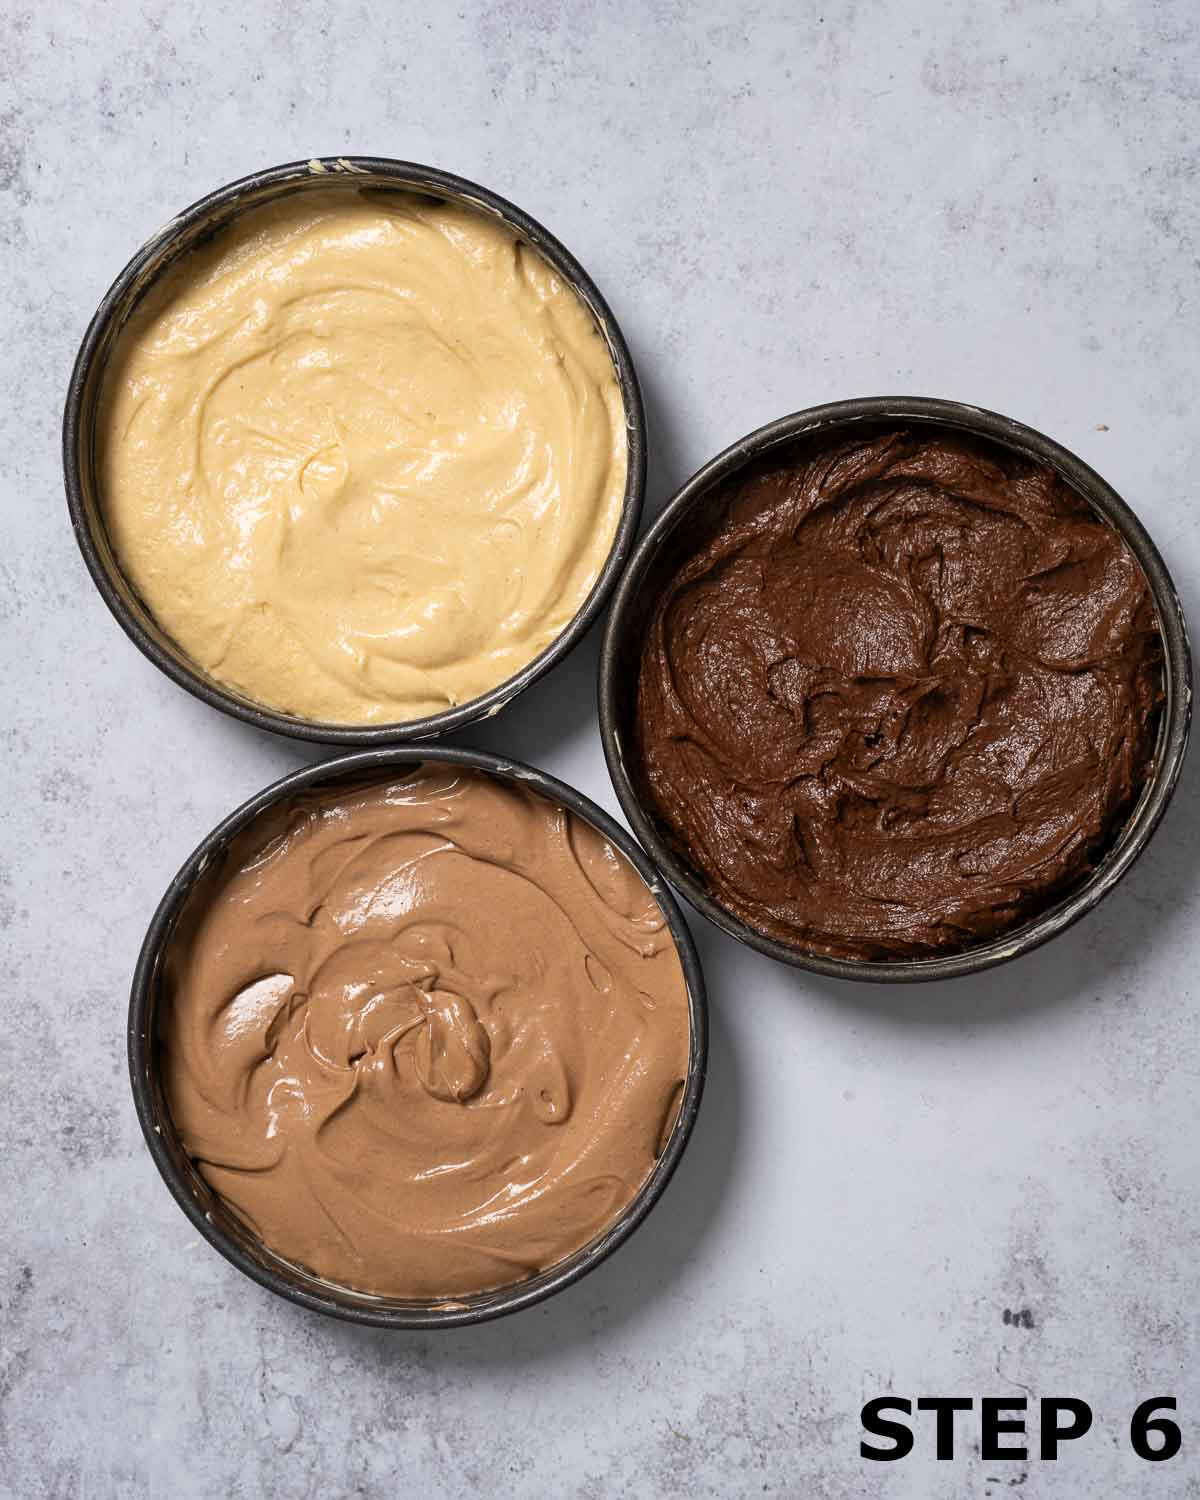
- Step 6: Transfer the batters to the prepared baking tins. Bake all three cakes for approximately 20 minutes until they spring back when lightly pressed or a skewer comes out clean.
Rest for 2 minutes then carefully remove the cakes from the tins and cool completely on a baking rack.
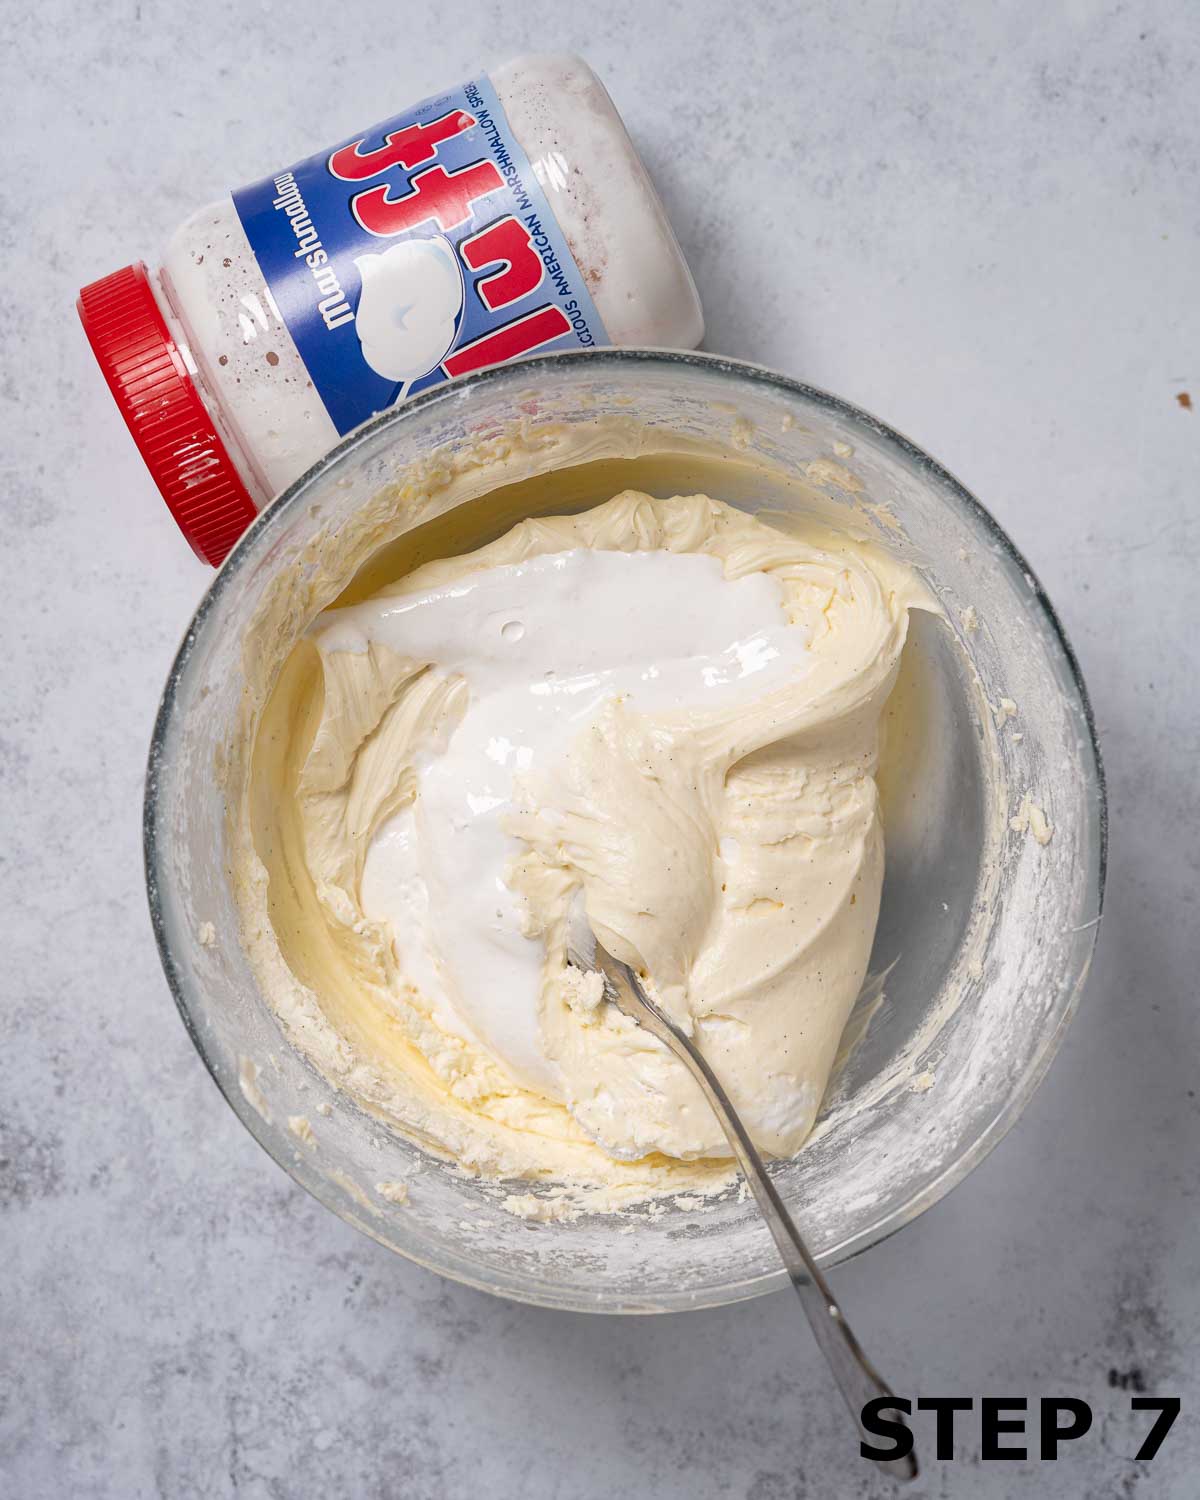
- Step 7: Make the marshmallow fluff buttercream: Beat the icing sugar, butter & vanilla paste together until smooth. Add the cream cheese and beat well. Finally, mix in the marshmallow fluff.

- Step 8: Lay the white chocolate cake onto a plate or board. Spread a heaped tablespoon of frosting over it and top with the malted milk chocolate layer.
Spread another heaped tablespoon of frosting over this layer and top with the dark chocolate sponge.
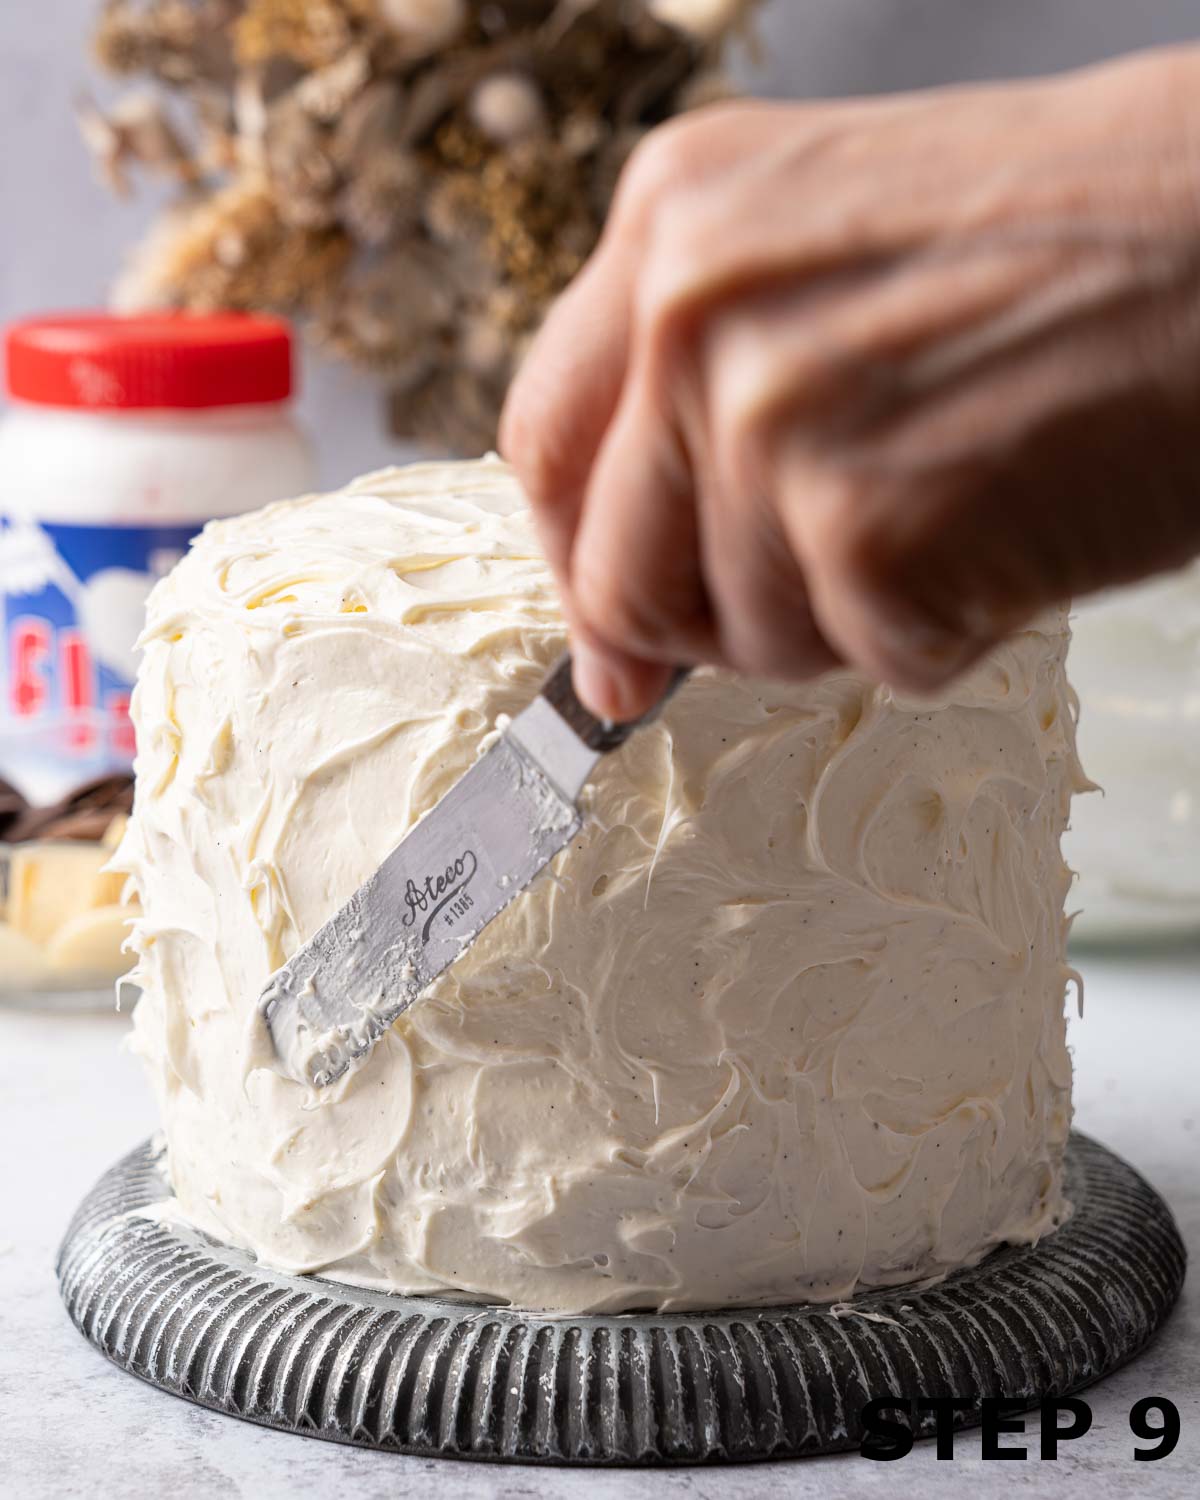
- Step 9: Once the final layer of cake is in place, spread a thin layer of icing all over the top and sides using a palette knife is good for this. This crumb-coating helps to seal in the crumbs. chill the cake for 20 minutes in possible.
Use the remaining icing to add a thicker layer that covers the cake entirely, then carefully move your cake onto a serving plate and touch up the icing if necessary.
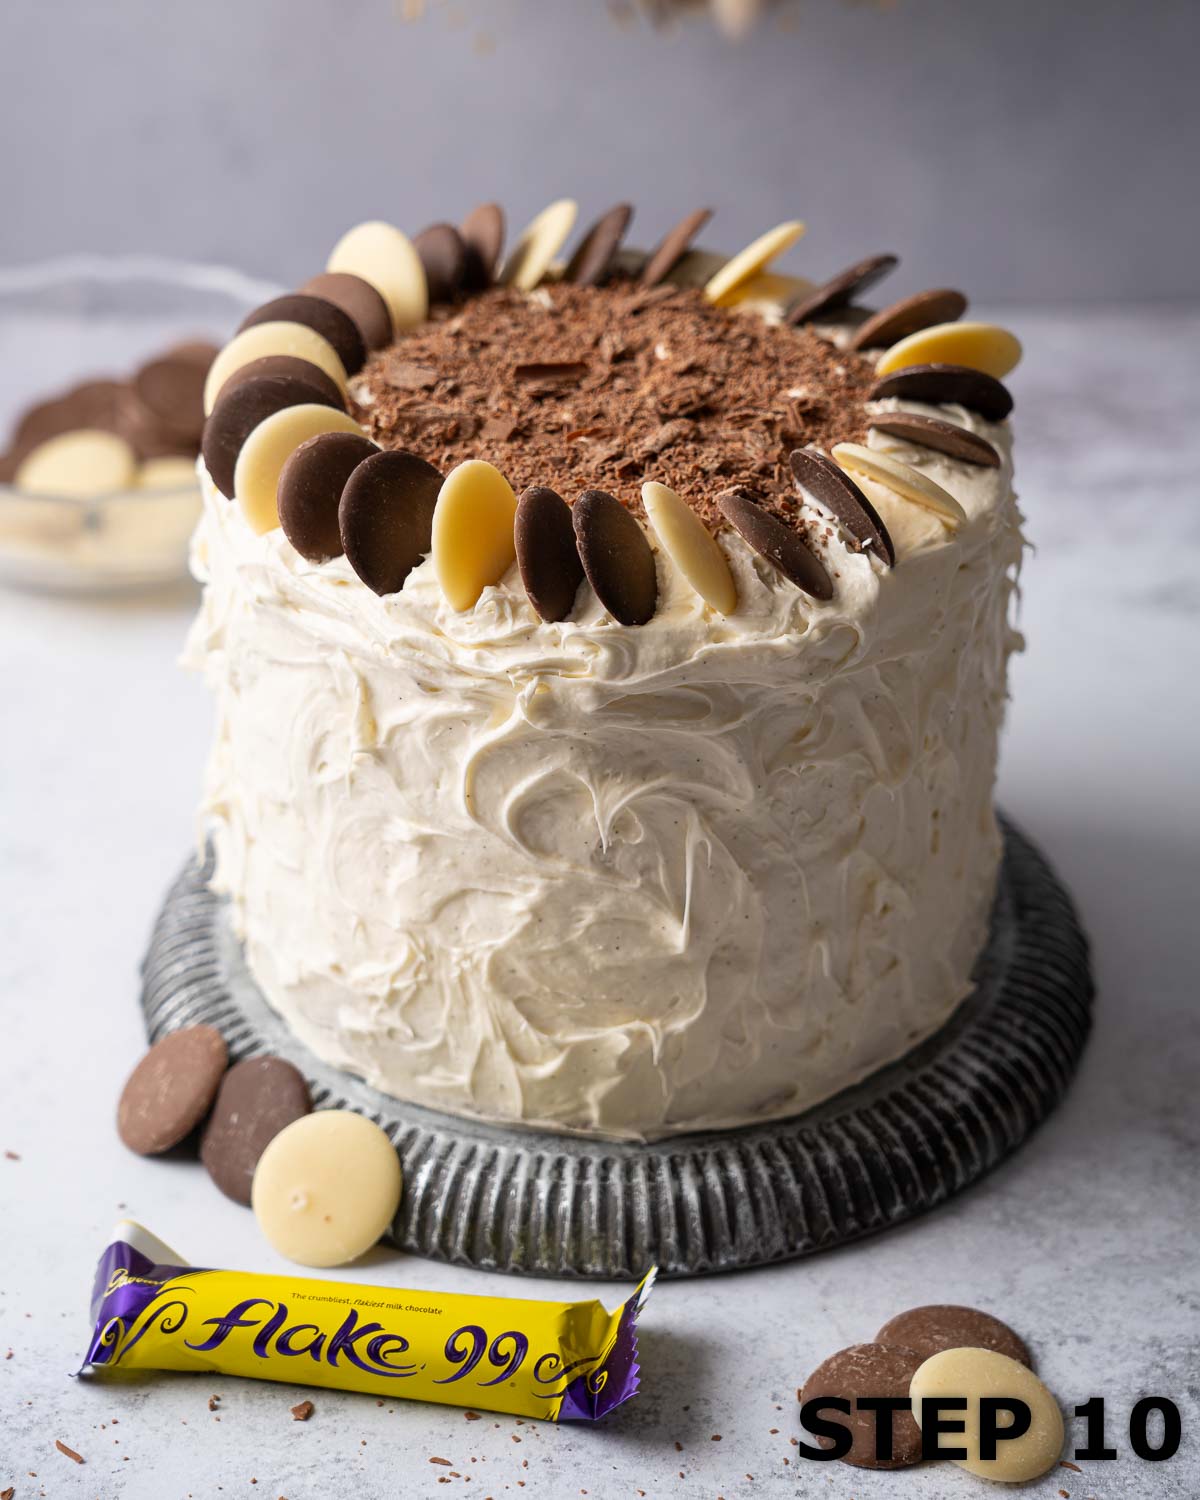
- Step 10: Decorate with flaked chocolate and chocolate buttons if desired (I used Cadbury white, milk and dark chocolate buttons).
Storage Instructions
The marshmallow buttercream contains cream cheese so this three layer cake will need to be refrigerated if it is not consumed within a few hours. Just let it come back to room temperature before serving.
Freezing Instructions
The sponge cakes can be made, cooled, wrapped and frozen for up to 2 months. Defrost fulling before proceeding to decorate.
Alternatively, bake & assemble the cake as instructed (but without the chocolate garnishes) then transfer to the fridge for several hours to firm up the buttercream. Wrap the cake carefully and freeze for up to 2 months. Remove the wrap before defrosting. Add the chocolate garnishes when fully defrosted. Individual slices can also be wrapped and frozen.
Expert tips
- Be accurate when measuring ingredients out: Pay careful attention to measures for the best results when baking cakes. I advocate the use of digital scales (and grams) over the cup system.
- Use the correct sized baking tins: This recipe requires 6-inch tins not 8-inch tins.
- Always grease & line the baking tins: Even if they are meant to be non-stick, it's much easier to get the baked cakes out of the tins when they have been greased (base and sides) and lined with baking parchment (base only).
- Heed my earlier advice for adding melted chocolate: Use room temperature ingredients, avoid letting the chocolate cool too much and stir a little batter into the chocolate before combining it with the rest. These steps help ensure a smooth, even batter without the chocolate seizing.
Frequently Asked Questions
If you follow my instructions carefully then this is unlikely to happen. However, if despite your best efforts, the chocolate does solidify whilst being mixed into the cake batter my advice is to proceed with baking it regardless.
You may then decide whether or not to use this imperfect layer of cake. If you decide against using it then whip up a fresh layer to use in its place and drop the imperfect sponge cake into the freezer ready to pull out when emergency chocolate cake is required to cheer somebody up.
This three layer chocolate cake recipe uses 3 x 6 inch circular cake tins. If you wish to use standard 8-inch tins, my suggestion is to simply double the recipe. In an ideal world, you would scale up the recipe to bake it using 5 eggs, but that leads to some fiddly measurements. Making double is far easier - just ensure you do not fill your sandwich tins more than ⅔ full with the batter and use the leftover batter to make a few cupcakes. You perhaps will not need to double the buttercream though - I'd suggest making 1.5 times that stated in the recipe.
Over-mixing leads to a dense cake, so mix gently and only until ingredients are just combined. This is especially important here as adding melted chocolate increases the risk.
By all means. Although the marshmallow fluff cream cheese frosting is delicious against the chocolate flavours in this cake you could swap it for vanilla buttercream, white chocolate buttercream, milk chocolate buttercream, dark chocolate & hazelnut buttercream or Swiss meringue buttercream. Get creative!
Yes - go for it! To do this you'll need to apply the marshmallow buttercream in a smooth layer then just drizzle your chocolate ganache around the edge of the cake.
More Three Layer Cakes
I have plenty of decadent & delicious layer cake recipes. Here are a few popular three layer chocolate cakes from my library.
Have you made this triple chocolate layer cake? I hope you enjoyed it. Let me know how you got along by leaving a comment or rating below - it would mean so much to me if you do. You can also show me your creation on Instagram by tagging me @jane_littlesugarsnaps.
Please add us as a trusted site on Google so that our recipes show up more in your searches!
Stay in touch: sign up to receive LittleSugarSnaps newsletters to hear when new recipes are published. Or follow me on social media:
📖 Recipe
Triple Chocolate Layer Cake
Equipment
- 3 x 6-inch sandwich cake tins Please note: this recipe uses 3 x 6-inch circular cake tins. If you are using standard 8 inch tins please see my notes below.
Ingredients
For the Cakes
- 180 g Butter or baking margarine (softened)
- 180 g Caster sugar
- 3 Eggs large, free-range
- 5 tablespoons Milk
- 180 g Plain flour (all purpose flour)
- 2 teaspoons Baking powder
- 50 g White chocolate finely chopped
- 50 g Milk chocolate finely chopped
- 50 g Dark chocolate finely chopped
- ½ teaspoon Vanilla extract
- 1 Tablespoon Ovaltine (chocolate malt powder)
- 1 ½ Tablespoon Cocoa powder
For the buttercream
- 125 g Butter softened
- 250 g Icing sugar
- 125 g Cream cheese full fat
- 1 teaspoon Vanilla bean paste
- 150 g Marshmallow Fluff original
Decoration - 1 Cadbury's flake (or 40g chopped/ grated milk chocolate)
- ½ Cadbury flake or 15g grated/ flaked milk chocolate
- 100 g Chocolate buttons Cadbury make white, milk and dark chocolate buttons now
Instructions
Bake the cakes
- Preheat the oven 170°/ 325°F/ GM3
- Grease and line 3 x 6-inch circular baking tins (note these are smaller than average tins - if you are using 8-inch tins see my notes on how to scale up the recipe).
- Melt the 3 types of chocolate in separate bowls (either in a microwave or using the bain-marie method. Set aside50 g White chocolate , 50 g Milk chocolate, 50 g Dark chocolate
- In a bowl beat the butter and sugar until light and fluffy, using electric beaters. Add the eggs, one at a time, beating well between each addition180 g Butter, 180 g Caster sugar, 3 Eggs, 5 tablespoons Milk
- Add 3 tablespoon of milk and beat again. Sift the flour and baking powder into the bowl and mix well180 g Plain flour, 2 teaspoons Baking powder
- Divide the cake batter equally into 3 small mixing bowls
- Bowl 1: Fold in vanilla extract.Bowl 2: Fold in sieved Ovaltine & ½ tablespoon milk.Bowl 3: Fold in sieved cocoa powder and 1 ½ tablespoons milk.½ teaspoon Vanilla extract, 1 Tablespoon Ovaltine, 1 ½ Tablespoon Cocoa powder, 5 tablespoons Milk
- Now add the melted chocolate to each bowl by stirring 1 tablespoon of cake batter into the chocolate first, then folding it back into the main bowl as follows:Bowl 1: Requires the white chocolate: stir 1 tablespoon of the vanilla batter into the white chocolate then fold it back into the bowl of vanilla batter.Bowl 2: Requires the milk chocolate: stir 1 tablespoon of the Ovaltine batter into the milk chocolate then fold it back into the bowl of Ovaltine batter.Bowl 3: Requires the dark chocolate: stir 1 tablespoon of the cocoa powder batter into the dark chocolate then fold it back into the bowl of cocoa batter.
- Transfer the batters to the prepared baking tins.
- Bake all three cakes for approximately 20-22 minutes until they spring back when lightly pressed or a skewer comes out clean.
- Let the cakes rest in the tins for 2 minutes, then remove them from the tins, peal off the baking parchment from the bottom of each sponge cake and let cool completely on a wire rack
Make the Marshmallow buttercream
- Put the icing sugar, butter & vanilla bean paste into a large bowl and beat until smooth125 g Butter, 250 g Icing sugar, 1 teaspoon Vanilla bean paste
- Beat in the cream cheese until smooth, then mix in the marshmallow fluff125 g Cream cheese, 150 g Marshmallow Fluff
Assemble the cake
- Lay the white chocolate sponge cake onto a board and spread a heaped tablespoon of the icing on top, then place the malted milk chocolate cake carefully on top of the layer of icing.
- Top with another spoonful of icing, spread it out and add the dark chocolate layer of cake.
- Once the final layer of cake has been added, carefully spread a thin layer of icing all over the top and sides of the cake - a palette knife is good for this. I find that coating the cake in a thin layer all over helps to seal in the crumbs. Once you have done this, use the remaining icing to create a thicker layer that covers the cake entirely.
- Carefully move your cake onto a serving plate and touch up the icing if necessary. Once you are satisfied, you can add a pattern if you want to. I used the back of a dessert spoon to lift the icing in places to give a rugged appearance
- Decorate with crushed/ flaked chocolate and chocolate buttons if desired½ Cadbury flake, 100 g Chocolate buttons
Notes
- Be accurate when measuring ingredients out: Pay careful attention to measures for the best results when baking cakes. I advocate the use of digital scales (and grams) over the cup system.
- Use the correct sized baking tins: This recipe requires 6-inch tins not 8-inch tins.
- Always grease & line the baking tins: Even if they are meant to be non-stick, it's much easier to get the baked cakes out of the tins when they have been greased (base and sides) and lined with baking parchment (base only).
- Heed my advice (below) for adding melted chocolate: Use room temperature ingredients, avoid letting the chocolate cool too much and stir a little batter into the chocolate before combining it with the rest. These steps help ensure a smooth, even batter without the chocolate seizing.
How To Stop Melted Chocolate From Seizing In Cake Batter
Each layer of this three layer chocolate cake contains real melted chocolate, which gives it an incredibly rich flavour. However, melted chocolatecan sometimes seize when added to cake batter if it is not handled carefully. A few readers have mentioned this issue, so here are my best tips to help you avoid it:- Use room temperature ingredients: Cold ingredients are the most common caise of seiezed chocolate. If the batter is too cold, the chocolate can start to set as soon as it is added.
- Work fairly quickly: Chocolate that cools too much after melting becomes harder to mix smoothly. I usually melt it just before I begin to mix the cake batter so it has around 5 minutes to cool slightly while I work.
- Temper the mixture first (important step): Do not pour melted chocolate straight into the batter. Instead, briskly stir one tablespoon of batter into the chocolate first, then fold this mixture back into the main bowl of batter.This helps balance the temperatures and prevents the chocolate from seizing.
Angela Barnett says
BEAUTIFUL CAKE , DO YOU THINK I COULD COVER THE OUSIDE WITH CHOCOLATE GANACHE INSTEAD OF THE CREAM CHEESE ICING AND JUST HAVE THE CREAM CHEESE TO SANDWICH THE LAYERS TOGETHER.
Jane Saunders says
Thanks Angela. I don't see why you couldn't customise the icing to your tastes and requirements. Let me know how it turns out.
Ashley says
Hello, Jane!
I love this cake, I made it for my birthday last year and it turned out great! Well, I’m not sure what’s going on now, but I made this cake for my sisters birthday a couple of weeks ago and it stuck to the pan horribly and fell all apart. I ended up having to cut the cakes into chunks and serve it as a trifle. It was a hit and the cakes were delicious, but I was really looking forward to serving the cake the wai yt was intended. I just tried to make the cake again, and the same thing has happened. I follow the recipe to a T.... except I make it in the 8” pans. Help, please!!
Jane Saunders says
Oh, how strange. It sounds like an issue with the pans, to be honest. When you say the cake stuck to the pan, do you mean the base or sides or the pan? Did you grease and line the pans with baking parchment? I've had trouble with greaseproof paper rather than parchment and likewise, I've had difficulty making cakes if my pans get too old and loose their coating. Even with new pans I always grease and line with parchment. Hope my thoughts help.
Ashley says
Thank you so much for your quick reply! The base of the cakes stick. I did grease the pans, but did not use parchment paper. I’m going to try again this morning using parchment paper, wish me luck! ????
Jane Saunders says
I'm sure that will make all the difference. Pesky tins.
Claudette Wesley says
Hi, I want to make this cake for my sons birthday party. I want to make double barrel cake with six layers. Will his recipe produce a cake that is dense enough be stacked and not topple over?
Thanks!
Jane Saunders says
Wow, that sounds like an epic cake. Lucky boy! The texture is very much that of a typical sponge cake - I've never attempted to stack a cake more than 3 layers high, so I can't say for certain if it might topple. I'd suggest using cake dowling to offer support to be on the safe side. And perhaps make the bottom 3 layers slightly wider than the top 3 layers of you have a variety of baking tins. Hope that helps.
Narine says
Hi, I love your cake looks amazing. I recently started to learn how to make cakes, I will definitely make this.
Jane Saunders says
Thanks Narine, I hope you enjoy your baking. Once you start, it's hard to stop 🙂
Lauren says
Hi Jane,
Your cake looks amazing and I'm in the process of recreating this (as a two tier version) for my niece's Christening cake, however the milk chocolate layer is proving problematic for me. I have made several attempts and this layer always looks fine when baking but once out of the oven shrinks. I just wondered which Ovaltine it is that you use - the one that is to be mixed with milk or the one that is made with water? - this is the only thing I can think that could be making a difference, the white chocolate and dark chocolate layers have baked perfectly and I'm at a loss with this but don't like to give up!
Jane Saunders says
Hi Lauren, sorry to hear that the malted chocolate layer is misbehaving. How strange. I baked mine with the original ovaltine, which requires milk. Are you using the same flour, baking powder etc as with the other layers? Everything else equal I'm at a loss as to why this layer keeps shrinking for you. Fingers crossed the change in powder works.
Jenna says
Hello,this cake looks amazing and would like to make it for my chocolate obsessed daughters birthday. I am just wondering if I can eliminate the marshmallow from the icing? I am planning on doing a chocolate ganash drip cake so am worried the marshmallow will make this to sweet.
Jane Saunders says
That sounds lovely. I can see why you might need to switch the frosting though. I'd switch out the marshmallow frosting for a regular buttercream or one from a drip cake if you have a recipe to hand. Happy baking.
Tania says
Gosh, this not only looks damn delicious the photos with the fairies are just gorgeous'! love, love, love!
Jane Saunders says
Thankyou so very much Tania.
Lara says
HI Jane - how many do you think it would feed at the larger size. Need a birthday cake for 25 people and my 10 yr old daughter is making it (with my help!)!
Jane Saunders says
Hi Lara, how lovely. I'd say the 6 inch layer cake would serve 10-12 comfortably whereas the 8 inch layer cake would serve 16-18. I honestly think you'll struggle to get 25 servings from it (sorry). If you go ahead and bake it, have fun. My tip would be to get your daughter to read through the instructions beforehand so she's clear when & how to mix the chocolate into the cake batter to avoid it seizing up on her.
Becky says
Hi Jane, I have just come across this and after I stopped laughing at your chocolate explosions I thought I would offer some advice ? I make sugar bowls with balloons and after a couple of colourful sugar explosions I found that filling the balloon with cold water stops it from exploding! I hope you don't give up on pinata domes.
Becky
Jane Saunders says
Oh Becky, thankyou for your advice. Occasionally the photos of myself and my kitchen after the explosion pop up in my personal Facebook memories feed (as if I could ever forget). I'm sure I will venture back to these cakes at some point - maybe when I'm a Granny - but I'll remember that tip. I think sugar explosions sound a bit more dangerous than chocolate ones 🙂
Maria Bazemore says
I’d like to make this for my daughter’s third birthday. She’s asked for red icing on her cake. Will this buttercream hold up to piping if I wanted to do some red accents around the edge? Thanks!
Jane Saunders says
Hi Maria, that sounds fun. I don't think you'll have any problem piping it. Can I make a couple of suggestions - if you think it's too loose to pipe straight away let it firm up in the fridge for a short time and maybe try piping a little bit first (off the cake) to see how you get along.